Last week, in the Ridge Meadows area, we had a call from a customer to come and fix some poorly installed roof vents. The customer recently had his roof redone and had exhausted all options on getting this local company back out to fix their mistakes. They were told quote “the roof vents are fine the way they are”.
When we arrived, right away we noticed a few problems with the vent installation and I’d like to walk you through them all so that you know what to look for when inspecting your own roof or attic.
The company used Certainteed Landmark Pro shingles and RoofRunner underlay. These are good products, in and of itself, but as with anything, only as good as the installer that’s installing them.
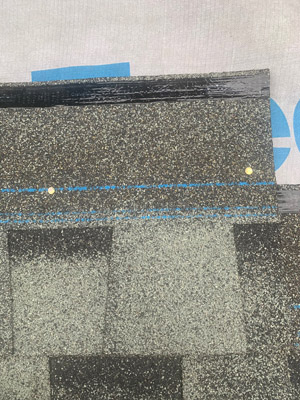
1.) The vent did not have the required double up of Certainteed Landmark Pro shingles on both sides and had exposed nails just under where the two shingles met. This would be an automatic fail from any roofing inspector.
Fail! – Exposed nail Fail: Exposed nail just under where the two shingles meet
2.) The vent installed was a Duraflo 75sq in vent. That means it’s made for a hole of roughly the same size. As you can see the roofing contractor “Cut” in a hole with what looks like a roofing hatchet and it’s only 6”x6”. That only allows the vent to do less than half its job at 36sq inches. We see this all too often when the installer is sub contracting the job. The faster they go, the more money they make in a shorter amount of time. In other words, it’s faster to quickly, “cut in” a vent with a hatchet, then to go and set up a saw and do it right. This is one of many reasons why we DO NOT use sub contractors at Whonnock Roofing and Gutters Ltd. We have found that the level of quality goes way down. As you can see in the pics below, there is a before and after pic of use cutting in the correct vent hole size.
Before: What we found After: Roof Vent hole cut as it should be
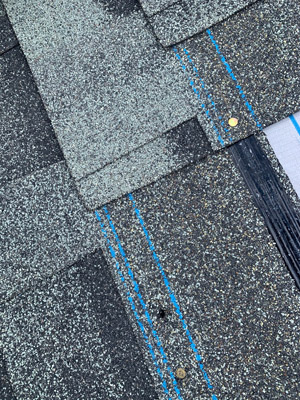
3.) Lastly, the nail pattern is way off. As you can see in the pic below, the nails should be installed into that 1.5” double blue line. That way, the nail grabs both parts of the laminated shingle and adds strength to the Certainteed shingles for wind uplift. Again, when you are trying to nail the shingles on fast, the installer, many times, can miss that mark as you can see in the pic below. As you will notice, this is a pic of what we saw and then an after pic of us using the proper nail pattern to re install the new Certainteed Landmark Pro shingles over the RoofRunner underlay. To reiterate, these are decent roofing products, but they are just not installed correctly.
Before: Nail Pattern wrong – This nail is not grabbing both parts of the shingle After: Correct Nail Pattern
4.) This is the a pic of what the roof vent looks like after it is done correctly right down to the rubber washer cladding screws in the vent to prevent driving wind/rain (there was none before).
Before: Note no cladding screws to prevent driving wind rain After: Roof Vent installed correctly
My hope is that you were able to learn something from this roofing blog and become a bit more “roofing savvy”. After all, your roof is the only thing protecting your home/investment from the elements whether you live in the Ridge Meadows area or beyond. Here at Whonnock Roofing and Gutters, we are only a phone call or email away to answer any and all of your roofing questions and needs.


